Showing posts with label Baldwin Patina. Show all posts

Tuesday, May 14, 2013

All done!

I finished the last of my unfinished projects from my classes a few weeks ago.

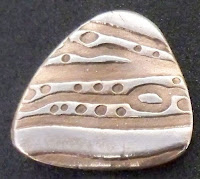
Here is the metal clay "wet" inlay technique.  The backing was made of copper and the bronze clay was inlaid.  I wasn't able to get it as smooth as it should be since I included a stone in this one, but still got it pretty smooth so it would take the Baldwin's Patina.


Tuesday, May 7, 2013

Dry inlay using copper and bronze clay

Another thing we did in Carol's class was Hadar's inlay technique.  Again, this wasn't the first time I've done this technique but I did have some things to learn to improve my pieces.

Carol refers to the two inlay techniques as "dry" and "wet."   In the dry technique a dry piece of clay is pushed into a wet piece of clay.


After firing and polishing, the two metals look very much alike.  Adding Baldwin's patina to the piece brings out the contrast by darkening the copper.  Baldwins has no effect on the bronze.  

I had never done the dry technique before so this was a first.  What was also a first was how much polishing was required on the inlay process.  Yes, I've done this before but had never polished mine as highly as we did this weekend.  (That Carol was a slave driver....... LOL!)

Carol demonstrating the polishing process with Pete looking on.


Testing the freshly fired pieces.

One of the first things we did was test the pieces to make sure they were fully sintered (completely solid metal.)  That was done by taking a coarse wheel to the back of them.  

My next post will talk about the "wet" inlay technique.  


Monday, October 24, 2011

Variations on a Photo Polymer Plate

One of the reasons I like working with metal clay is that techniques from other media can be used.   From the art of print making, we get the photo polymer plate.  Photo polymer emulsion is used to create stencils on a silk screen and the plates are used to print letter press, blind embossing, intaglio printing and to create a dry offset plate.  In metal clay, we use the plate to create a "mold" for our clay.

The plate material is UV photosensitive and has to be kept in the dark until ready to be used.  A high contrast negative is printed on a clear transparency sheet and this sheet is placed on the plate, then exposed to UV light and finally washed with plain water.  The unexposed portions of the negative (the black areas) will wash out leaving a recessed area in the shape of the blackened areas.

Metal clay is rolled out onto the PPP plate. The recessed areas of the plate now project from the clay and the opposite areas are now recessed.  The finished plates have to be kept oiled and in a dark area.  The polymer plates can become brittle over time and can break.  Some of the plates come mounted on a metal plate and these don't seem to bend like unmounted plates do.

The PPP plates are a perfect mold for creating the inlay designs with copper and bronze clay so I pulled out my collection of plates and gave a few of them a try.  The photos here show some of the variety of finishes and clays I've used with a PPP plate.


Here is the exposed PPP plate.  This design was based on a necklace I fashioned after an Ojibway Indian Design.  The original necklace was loosely based on the design and this earring design was taken even farther. 


The first earrings made with the plate were silver.  I actually made two pair and colored both pair with enamel.  (Sorry but the picture isn't the best.)


I used silver again when I used the plate for the third time.  This time I just polished them up and added a patina. 


Yesterday, I tried using the copper and bronze inlay technique with the plate.

It's interesting how different a look each pair gets just by using a different metal or a different coloring technique.  


Monday, September 19, 2011

Copper and Bronze clay


     As was mentioned in my previous post, I've revisited working with copper and bronze clay.... via Hadar Jacobson's powdered clays.

     A little over a week ago several of my friends and I had a play day to try out the clay. Ginnie Weltner, who is a frequent student and friend and my college roommate, Cindi Armstrong  (who visits every Labor Day weekend and is a once a year student) helped me test out the powdered clays.

     We each mixed our own clay and tried Hadar's "inlay" technique which is one of the first projects in her most recent book, Pattens of Color in Metal Clay; Canes, Gradients and Mokume-Gane.   My friend Carol Scheftic has a photo of two of her pieces in Hadar's book.  One of them is the inlay project.  The book is worth checking out.

     The inlay project is made by rolling the copper clay to the thickness of two popsicle sticks, impressing a deep texture or object into the clay, filling the depression with the bronze clay and sanding the piece to expose both of the clays in a level surface.  (Now I know that my description is not very detailed and it's not meant to be.  For more detail, check out Hadar's book.)

     For the most part it's not working with the clay that stresses people out but the firing process, which I'll talk about in another post.   Luckily, both my test piece and the final pieces fired successfully at the recommended temperatures.  

     The only thing I noticed was that the bronze appeared to be more porous looking and had small cracks in it.  (It wasn't the same in all the pieces which could be attributed to us each mixing the bronze clay differently.)  I also know  I wasn't as careful mixing the bronze as I was the copper and felt that we all had it a little drier than it should have been.  (Another learning experience!)  We could repair the cracks and re-fire the pieces.  (Which we don't plan on doing as they were very small.)

     The final step was to apply Baldwin's Patina to the highly polished and cleaned pieces.  Baldwin's Patina is specially formulated to work on copper and bronze.  I found it worked best when the piece was warmed up in very warm water.  (Otherwise the clay just seemed to suck the patina right in.  It didn't do that in the video!  Hadar's blog offers a video on how to apply the patina.)   The patina highlights the contrast between the copper and the bronze.

     So far, the only thing I do not like about using the bronze and copper clays is that they are very dirty to work with.  Using liquid gloves does help keep the hands cleaner, but somehow the darn stuff manages to still get under the fingernails and the dark dust is everywhere.

     I have several other pieces ready to be fired before I decide for sure whether I like this clay or not.  They all use the drape method and will be much lighter in weight than the inlay pieces.  I'll keep you posted.

Sunday, January 17, 2010

Okay?????


One of my favorite things I learned in Tim McCrieght's color workshop was something called copper cladding. Basically the process is covering fine silver in copper. Okay?????? Why would anyone cover an expensive metal like fine silver with a lesser metal like copper? Because it is fun and looks great!

The process involves dropping silver (with a paper clip on it) into an over saturated solution of pickle. (Pickle is used to remove oxidation from silver and copper.) The paper clip is used to create a charge, which causes the copper to adhere to the silver. (I think that is the way it went. I knew I should have taken chemistry in high school, but at the time it didn't seem important.) The silver with the paper clip on it was heated first with a torch. Again, I think this was only to remove the coating on the steel paper clip. Anyway, the heated piece makes that fssst sound which I love, when it goes into the liquid. We left them in there a few minutes. Often we got busy and forgot about them so they were in there longer, but I'm not sure that made much of a difference.

When they came out of the pickle, they looked like a piece of copper. What makes it worthwhile is cleaning off the high areas. Polishing with a cloth, tends to go into the recessed areas and remove it. I used a nail buffer instead which was rigid and polished the high spots.
This piece was one of my favorites.

More copper examples and pieces to come. This process is so cool. (Okay, I dated myself with that word. But at my age I don't care. There's got to be some perks to getting old.)