Showing posts with label Adding color to metal clay. Show all posts

Thursday, October 18, 2012

Yep, it's Autumn

The leaves this year have been downright gorgeous and the change took place early.  There are still some beautiful colors out there but they'll be gone soon.


The last few days have been very productive for me.  I didn't get into the studio until after noon each day and worked until seven every night.  (I need to get out of bed earlier and put in a nine to five workday........ as if that will happen.  Sleeping in is one of retirement's perks.)  

I was working on my National Transit Jewelry series.  (Can't share any pictures though as I'm planning a scavenger hunt to see if people can find the pieces of architecture that inspired the jewelry.)

But, while I was waiting for the pieces to fire I decided to try out alcohol inks to add color.  Awhile back I took a class with Tim McCreight on adding color to metal clay.  I posted about that class in January of 2010.  That class involved using enamel, resin, colored pencils, flocking, and liver of sulfur among other things.  

Lately though I've been seeing a lot of metal clay pieces that are colored with alcohol inks.  One of the metal clay artists to use the ink is Janet Alexander.    


And, since this post is about autumn (and color)......... I felt it was appropriate to work with some metal clay leaves I had laying around.  

Real  leaves can be coated with multiple (and I mean multiple) layers of metal clay paste.  Each layer is completely dry before the next layer is added.   The leaves can not be waxy or hairy.  The leaf is left in the clay and burns out during the firing process.  The Gatlinburg TN leaves are from the geraniums that adorned the flower boxes on the street.

The other leaves were made by rolling the clay over the fresh leaf and peeling the leaf off the clay.  I use this method often with my favorite leaf, the gingko leaf.   I like it because I can create a nice shiny border around the edges.  Or, as is the case with the weed, cut out a shape around the piece. 

Alcohol inks can be found in the stamping/scrap booking section.  They are permanent (although they can be sanded off the metal.)  And, they can be used on a variety of surfaces.  They can be applied with the thin applicator tip (if you have deep, concise depressions) or applied with a brush.

I used a brush for these pieces.  The brush was necessary to paint in the variegated colors in the Florida leaves.  As I was painting and blending the colors, I realized how much I do like to paint.  Maybe I'll do a painting too.  Damn, I just like to do it all!


Thursday, September 29, 2011

Can't keep a Ginkgo down


A few posts back I was lamenting the fact that the Ginkgo tree along the path I walk to the studio had been trimmed.   And, all the branches (and leaves) were no longer within my reach.  (But some of the path has such low hanging branches that I have to duck to walk through there.  Can't figure out why they weren't trimmed.)

Well, you can't keep a Ginkgo tree down.  There were five little leaves breaking through where a branch had been cut off.  So I was able to get one last leaf today to use with the metal clay.

Since we were working with copper clay today, I now have a copper version of the Ginkgo for a pendant.  (At least in the greenware state.  Will wait and see what happens when it's fired.)

Friday, July 22, 2011

Other side of "need a pearl?"


In my previous post "need a pearl" I was asked if the piece was a lentil bead.  Yes, indeed it is.  Besides making rings, I love making lentil beads.  I think that's because they so easily lend themselves to reversible pieces.

The other side to the faux pearl piece has Aura 22 on it.  Maybe it's my old eyes, but for me the gold never shows up very well.  (I also knocked off the post for the pearl when I was torch firing the gold side.  Live and learn.)

And, as usual my photo skills leave something to be desired.  But for what it's worth, here is the other side.   Oh, and take a guess what color of shirt I was wearing the day I took the picture.

Saturday, January 30, 2010

An end to the color workshop


Finally, this is my last post about the color workshop I took with Tim McCreight. (Well until I add color to a finished piece of jewelry and not these samplers.)

Tim had some unusual media with him for the workshop. One of which was flocking. (Like what use to be on wall paper. When we bought our house, the front room had gold carpet, a fingernail polish pink wall and red and silver flocked wall paper. God, it was awful!) I tried some of the red flocking. It came with an adhesive red paint that was used first; then the flocking was sprinkled on. I hated it! (Almost as much as I hated that wall...... and Tim's example looked really nice.) Anyway, I tried scraping it off before I ended up torching it off (and breathing in all those toxic fumes from the polyester it is made of.) The damn thing would not totally burn off. It just turned black and stuck. So, I ended up scraping it off after all.

I found some flocking in a mini-pack of colors at Michael's. I can't believe I bought it and tried it again. This time I used a plain glue before sprinkling on the flocking. I'm not crazy about it but at least I don't hate it.

Michael's also had some really cool glitter and mini glass marbles. So, of course I tried those too, but just the marbles.) They are really interesting little things. (I like little things. My husband gets mad when I tell people that. I never did go for tall, dark, and handsome. I'd rather have a short and handsome type.)

My main concern with these "kitschy" color mediums is their staying power. I suspect they will fade over a very short time period. Which brings me to my conclusion about using color with the silver.

Which is ...... color for color sake is never good. Color is a design element which needs to work in harmony with the other design elements. It must play an integral part to the total design if it is to succeed. I love the look of silver and the contrast of textures, lights and darks, and positives and negatives. Unless a piece tells me that it "needs" color (remember my jewelry talks to me) I won't be using color arbitrarily any time soon.

At least not in my jewelry. But..... a piece of sculpture could be no holds barred for any form of color media.

Playing with resin, is next on my list. But I'll try it out without using the fine silver.


Wednesday, January 27, 2010

Traditional color


Enameling is a very old technique of adding color to metal, so of course it is one of the methods we were able to try out during Tim McCreight's color workshop. I waited until I got home to do my enameling.

For some reason, my enameled pieces never photograph very well. These are much cleaner than they look.

The single colored piece is created by sifting enamel onto the silver in an even layer. The multi-colored piece is made by mixing the powdered enamel with water and an enamel adhesive; then wet-packing it into the recessed areas.

Wet packing often involves using a mini-spoon type tool or a brush. I took a basic enameling class from Leslie Tieke in Tennessee and she had us use straws that were cut to a point on one end. They worked great (and are much cheaper.)

Currently I'm reading Linda Darty's book, The Art of Enameling. I plan on reading every single word (I told you I was anal.) There's lots of good information that is very clearly written. My order for copper just came the other day as I plan on trying out as many techniques from the book as I can. Copper is cheaper.

I was also pleasantly surprised when I came across several enameled pieces by Adrienne Grafton in Ms Darty's book. (One is on the back cover. She also wrote an article in the book on making a cloisonne' brooch.) Adrienne use to have a studio across the hall from me at the Transit Building but she relocated her studio to Shadyside. She is currently teaching an ongoing enameling class in New Castle, Pa.


Friday, January 22, 2010

Contemporary color


Tim McCreight's color workshop covered the range of traditional coloring techniques to non-traditional ones.
Experimentation was the word of the class, so experiment we did. Tim brought an assortment of coloring media and so did other class members.

The first piece was colored with Prismacolor pencils. Since the pencils need a "tooth" to hang onto, the metal clay piece was fired but not brushed or polished. Turpentine was used to blend the colors. Polishing was done by hand after adding the color. I've seen beautiful metal pieces done with colored pencil so I was a little disappointed when I tried this technique. But, the area I was coloring was small and I only had a few layers of pencil. Other classmates who had taken the Debra Weld workshop on adding color said they had "hundreds" of layers of pencil. (All said in a manner which indicated lots of hours.)

The second piece was colored with Liquid Sculpey to which liquid color (and sometimes powdered color) had been added. This was a fairly easy process but can be "peeled" right off the piece when dry. I did this in lieu of messing with resin, but I am going to try resin at my studio. (Resin was one of those many things I bought to try but never got around to.)


Sunday, January 17, 2010

Okay?????


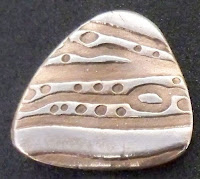
One of my favorite things I learned in Tim McCrieght's color workshop was something called copper cladding. Basically the process is covering fine silver in copper. Okay?????? Why would anyone cover an expensive metal like fine silver with a lesser metal like copper? Because it is fun and looks great!

The process involves dropping silver (with a paper clip on it) into an over saturated solution of pickle. (Pickle is used to remove oxidation from silver and copper.) The paper clip is used to create a charge, which causes the copper to adhere to the silver. (I think that is the way it went. I knew I should have taken chemistry in high school, but at the time it didn't seem important.) The silver with the paper clip on it was heated first with a torch. Again, I think this was only to remove the coating on the steel paper clip. Anyway, the heated piece makes that fssst sound which I love, when it goes into the liquid. We left them in there a few minutes. Often we got busy and forgot about them so they were in there longer, but I'm not sure that made much of a difference.

When they came out of the pickle, they looked like a piece of copper. What makes it worthwhile is cleaning off the high areas. Polishing with a cloth, tends to go into the recessed areas and remove it. I used a nail buffer instead which was rigid and polished the high spots.
This piece was one of my favorites.

More copper examples and pieces to come. This process is so cool. (Okay, I dated myself with that word. But at my age I don't care. There's got to be some perks to getting old.)

Saturday, January 16, 2010

Tim McCreight Color Workshop


Got home today from the color workshop at the Society for Contemporary Crafts in the Strip District in Pittsburgh. What a wonderful class. I can't say I accomplished a lot, but I certainly did learn a lot.

The class was taught by Tim McCreight. Tim is pretty much the first person in the United States to get the chance to work with metal clay. He is a consultant for the Mitsubishi company who makes the clay. It was his first time in Pittsburgh, but it won't be his last. He is coming back the first week in June to teach a class on mold making and another Rio Certification class.

Tim's teaching style (at least for this kind of class) was laid back and non-stressful. It was a class of experimentation and very enjoyable. I would recommend one of Tim's classes to anyone.

On Friday night, about fifty people attended a reception the Western Pennsylvania Guild held for Tim. After socializing over food and wine, we were treated to hearing a little bit about Tim's life and career. He is an interesting speaker who is very personable and humorous.

Over the next few days, I'll share some of the things we learned in class and show my examples. The teacher in me took the educational approach and made my pieces with the intention of making a chart. (With all that silver, it's going to be an expensive chart!)