Showing posts with label fine silver. Show all posts

Sunday, December 13, 2015

Varying a multiple

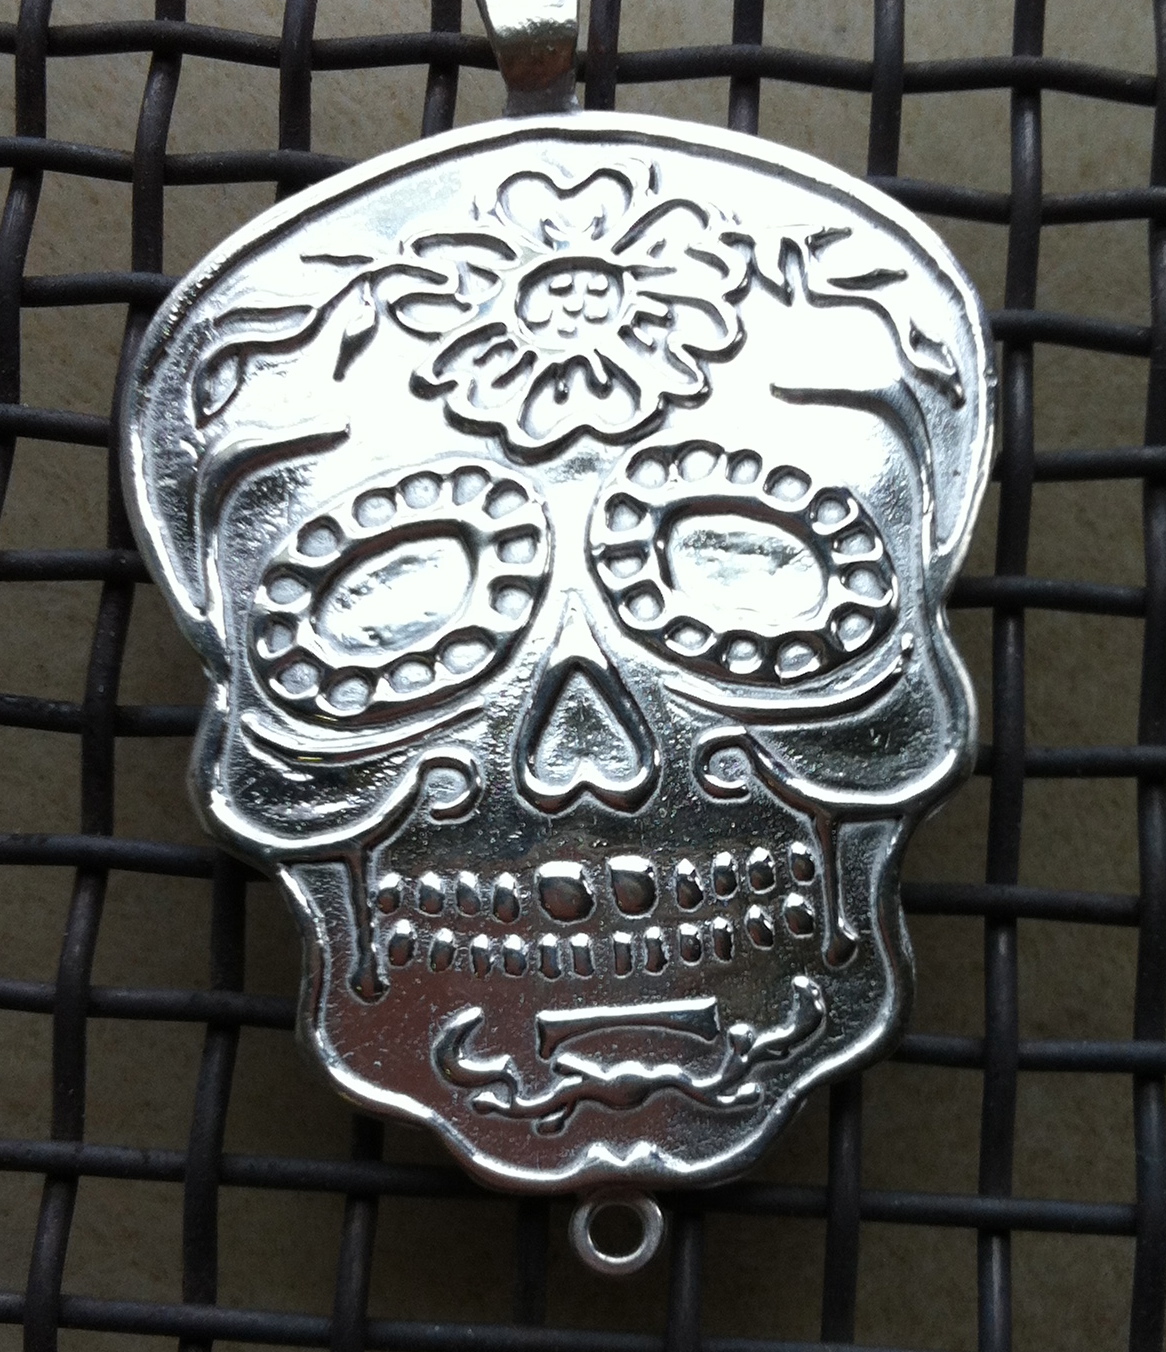
The photopolymer process is often used to create multiples.  This makes it quicker and easier to repeat a design.  If I want to be able to tell people that a certain piece is one of a kind, I need to vary each piece a little.  Often that is changing the color of a CZ or firing the piece in a different generation of clay which creates different sizes due to the shrinkage of each generation.  It may also mean varying the kinds of beads that each piece utilizes in it's final design.  These are some of the things I did with my skulls.


Tuesday, December 8, 2015

Sugar Skulls........ Making the plate

The design has moved from the brain to the hand.  The preparations have been made and now it's time to make the photopolymer plate.  Next to making rings, this process for making the mold is one of my favorite things to do,.

Photopolymer is a process taken from the printmaking world.  I use to do t-shirts using the photopolymer emulsion on a silk screen.  Instead of squeegeeing ink through a screen to create the finished design, it is used to create a reusable mold.  In both instances it is used to make multiples.

Photopolymer plates can be plastic or metal.  Both are covered with the light sensitive emulsion and both require the same finishing steps.  The plates can be different thicknesses from ones that create a shallow to a  very deep design,  Plastic plates will warp and harden over time.  Metal ones will last longer. Both should be oiled and kept in a cool place after use.

Okay, I've gabbed enough.  Here's the process.

Working in a room with very low lighting, place the transparency that contains the desired design on the emulsion side of the plate.  (The print should be as dark as possible.  Sometimes I tape two prints together.)  Create a sandwich by layering a hard piece of backing,  a spongy material, the plate with the design on it (if it contains lettering they must read backwards), and a piece of glass.  This sandwich is held together by clips which compress everything for the best contact of the plate and design.

The next step uses a UV light (but you can also go outside and dance around in the sun...... if you have some.)   I use the light.  Place the sandwich (glass side up) in the UV light (be sure not to look in when the light is on.)  Time for one minute.  Take the sandwich apart and head to the sink to brush the plate with a soft bristle brush. Scrub until the softened emulsion is brushed off.  (Brush gently or the design could be lost.)  The areas covered with the black design were protected from the light and will wash out.  The areas where the light was able to get through will harden and remain.  After brushing, rinse the piece to remove stickiness.  Pat dry and place back under the UV light to finish curing.

The plate is now ready to be used with the clay.


Monday, December 7, 2015

Sugar skulls - preparing the drawing for the photopolymer plate

Once the design has been decided on, it's time to make the photopolymer plate.  The plate is a piece of metal covered with a light sensitive emulsion.  It is kept in complete darkness until it's time to "cure" the plate and create the design.

The first step in the process is to take the finished design and print it onto a transparency sheet.  If you are as old as I am, you'll remember these as what was used to create a presentation on an overhead projector (those are obsolete too.)  The one thing that has to be remembered is that what ever is black in the drawing is what will be raised on the finished silver piece.  Sometimes it is during this step when I have a "Senior Moment" kick in.  (Too many of those..... moments!)
Remember..... what is black will be raised in the final piece.  This is what I wanted my finished pieces to look like........ This is not what my first few finished plates turned out like.


Sometimes after a design is decided on, it is necessary to invert the back and white to get the desired effect.  I inverted my drawing for some of my first plates.......... which gave them a whole different look than the one I was going for.    But........ it wasn't a failure....... just different.


This is what the design looks like using the first drawing.  This is rather large and is not yet finished as I want to add color in the form of resin or enameling.  


How it looks using the inverted drawing.  (This is unfired, dry clay.)
What a difference it makes.  

In my next post,  I'll share the photopolymer process itself.  (I just love making them and using them!)


Thursday, December 3, 2015

Better late than Never or (I think I've used that title before.)


This post should have been made over a month ago, but of course I was still in my "funk" period.  But, as the title says...... better late than never.  

I've been reading Kathy Reich books and watching the entire ten seasons of "Bones."  That and seeing my daughter's skull necklace must have influenced me.  I was certainly into a Sugar skull mode.  

I made more skulls than I intended  due to a mistake on my part.  I made several photopolymer plates from my skull drawings.  A photopolymer plate is a way to make molds or "stamps" from original drawings.  In a future post I'll share more info on the plates and how my mistakes made for more variety in the skulls.  

Wednesday, December 2, 2015

It makes sense!

In a post (long, long, ago and far, far away) I commented on how my husband and I are mountain people.  We love to vacation in the mountains (Gatlinburg, TN to be exact.)  Beach vacations are not out of the question but not my favorite.  I don't like sand up my suit and hot, hot sun on my body (although I do like more summery weather.)  I prefer pools to the ocean as I like to know what is under me.

But for some reason, many of my pieces have a water theme.  I could never figure that one out until a customer helped me this past fall.  She asked me if I was a Pisces.  I am.  Never placed much stock in one's zodiac sign but now I'm not so sure.  It makes sense!

This is one of my favorites....... Diving for Pearls


Monday, November 30, 2015

Finally

Well, it's finally over.  I am over my funk.  There hasn't been a post since February and I'm sure that no one is even trying to read my posts anymore.  But that is okay.  A blog is an online journal (as opposed to a personal diary where everything is private.)  Here is where I can share my life and my work.  I guess this is one year that I won't be publishing my blog in book form (it would be about three pages long.)  Next year's book will be a two year publication.

Let me explain the eleven month absence from the blogger scene.  As you can see by my last post, I was in Florida last year for a vacation.  Whenever I come back from a vacation filled with sunshine and have to return to gray, snowy PA, I get into a funk.  That funk usually lasts about a month and then it's over.  This year it lasted much, much, much longer (as you can tell.)  I never thought it would end, but about a month ago I started to come out of it.  (I have to admit that maybe my husband was right...... we all need to get some form of exercise.)  I started walking on the treadmill every morning before I did anything else.  I don't walk fast but I do keep raising the incline every two minutes.   I've started to cut back on portion sizes and trying to eat better (although I ate lots of popcorn at the movie last night.)

In June, my mother fell and broke her back in two places and I've been taking care of things for them ever since.  I think I was using this as an excuse for my funk too.  How can I go to the studio when I have to buy groceries, take my parents to appointments, run errands, etc.?  Maybe I was feeling sorry for myself.  Poor me.  But I don't feel that way anymore.  I have more energy to take care of them and do the other things I need to do.  I look at this as a way for me to spend more quality time with my parents who are 88 and 92.  I am so lucky to still have my parents.  Many people would gladly trade me places if they could have their parents back.

All in all, I'm feeling good about myself.  My desire to work in the studio is back as strong as ever.  I may not get in there as often as I would like, but I "want to" and that is a good sign.

So, from now on I'm back to blogging.  Back to creating and multi-tasking as usual.  It's a good feeling.

Hope to share more in the weeks to come and more stories about the grandchildren.  Here's something new from the studio.   (Nothing major, just some simple pieces for the holidays.)


Sunday, October 5, 2014

Memoirs of an Art Festival .... or I survived rain, hail and freezing weather!

Finally did another out door show.  The last one was three years ago.  I bought an expensive tent back then and went for it.  Then packed it all up and let it sit in my vault.

That show was Oil Heritage.  We set up on the road (hence the need for sandbags as a way to hold the tent in place.)  The temperature was ninety degrees in the shade (and the back of the tent was 110 degrees.)   My goal then was to create a feeling that the inside of my tent felt like a gallery .  I wanted to make sales but since it was my first time I felt happy just to achieve my goal.  Luckily I achieved both the goal and money.  My tent also got tested with a major rain storm during that festival, complete with wind.  It held up where others lost their tent and some of their art.

This time I was going for the money (and of course trying to keep the gallery feel.)  Again, I achieved both goals.  I only set out my metal clay pieces (no beading or polymer pens) and focused on selling my jewelry.  Often I tend to talk too much about the metal clay product and promoting my classes.  That was out this weekend (although it did sneak in a couple of times.  I just couldn't help it!)


Doing Festivals is hard, hard work.  Setting up that tent really is easy but I have trouble with those little push button connectors and I'm such a wimp.  The poles are heavy (thank goodness my husband helped out.)   Hauling all those things out of my studio (and then hauling them all back in ) is tiring.  Getting everything set up and making sure I have everything I need is time consuming.  (That's day one.)  Then for the next three days I got up at six AM and made sure I was down there to get a parking spot close.  (Anyone who knows me knows I am NOT a morning person.)  My booth was by the food court and sitting in the tent for eight hours each day, treated me to tempting smells of a variety of foods. 

My husband helped me set up and take down the tent and my cousin Debi helped me all three days.  I couldn't have done it without her.  (Someone has to be there during my pee breaks.)   She also helped out by sharing all that good festival food with me.  

The first festival was sooooo hot.  This one was soooooo cold.  (39 degrees to be exact.)  We had wind, we had rain, we had mud, and we had HAIL...... and my tent held up.  I paid extra for electricity and I'm glad I did as we had a heater back in the corner to keep warm.  The first two days we took turns sitting in front of it.  Today, Debi brought a second heater so we didn't have to share.  (I had already decided I wasn't going to anyway LOL.)  The first day I started with just a sweater jacket, yesterday I had on a fall jacket and today I went full tilt and pulled out the winter jacket and gloves.  Should have gone for the hat too.!

I figure that I've already done roasting and freezing.  As they say, third time is a charm..... so I am counting on the weather being "perfect" for my next festival.

I'll be posting "things I learned at the festival" over the next few days (maybe weeks).  These will be my Musings on an Art Festival.  Stay tuned.  


Wednesday, September 24, 2014

New Displays

I've been working my butt off making new pieces for AppleFest which takes place Oct. 3, 4 and 5 in the city parks in Franklin, Pa.  This is my first year and I want to put my best foot forward.

Speaking of foot....... I got some new displays for the festival.  One of which is a foot to display anklets.
Now maybe it's just me but why do the foot displays have the heel of a shoe and barefoot toes.  I understand the heel raises it, but why not have a shoe on that foot?  Just saying!  (It kind of freaks me out.)


There is plenty of room in my front studio to display pieces but the tent is only 10' x 10' (a little crowded.)  I needed some displays that saved space and these next two pieces did just that.  In fact, I can't believe how much more room I now have.  (Got to keep the nose to the grind, I guess.)


This display rotates and will hold thirty two pieces.  (Both of these displays could hold much more if my backings were smaller.)

If you are in PA with nothing to do, stop down.  The food is good, the activities are fun and there are lots of vendors.  There's something for everyone.


Wednesday, September 17, 2014

A little Beachie

Still working on pieces for AppleFest.  Since the craft show appeals to a variety of people, I felt I should have a variety of price points and designs.

So....... I've been making some simple pieces with Lake Erie beach glass (why, oh why did I give the grandchildren free range to pick some  beach glass from my collection) and metal clay sheet (AKA metal clay paper.  It's just semantics!)

They aren't particularly creative but they are fun to make and they are pretty!


And of course, everything I do comes with a few problems along the way.  This time was no different.  Super glue leaks through paper towels and puts holes in the table cloth.  (My fingers got stuck a little too but nothing serious.  Got to them early.)


Friday, September 12, 2014

Ink Blot test

I spent a little time in the studio today, after the Arts Revitalization meeting and before heading home to make appetizers for the "Dark Arts' opening tonight.

I was working on adding metal clay shapes onto beach glass.  As I was sifting through my scraps of metal clay sheet I kept picking up interesting negative spaces left over from previous punches.  (As you can see there are lots of them.)


So, I pulled out a few and started to play with some designs.  For now they are just ideas, but I plan on completing some of them into finished pieces.  I'll be using textures on the back and adding embellishments to the front.  Think I'll add some CZ's (they are always good for sparkle.)   


They look like ink blot tests don't they?  What do you see?

Thursday, August 28, 2014

Keeping it simple

Finally....... I'm going to do AppleFest this year.

So with the festival being only a month away I'm now in production mode.  I have quite a big inventory all ready but wanted to add some to it.  This week I got into the studio four days and got quite a few fine silver pieces started.   Next time I'm going to work on copper and bronze pieces.

Since I want to keep cost and prices down I decided to keep it simple.  I'm just playing with all the new texture plates I got recently and have some new favorites.


I used the flex shaft to shine all these pieces.  Guess I never did that many at one time before as my fingers were buzzing long after the flex shaft was turned off.

Then I added liver of sulfur to most of them.  I never polished that many at one time either. Going to need to take Aleve tonight.

Don't let it be said that working with metal is easy.

Sunday, August 3, 2014

It's going to be small!

Every year I publish my blog in book form.  I just realized that my last post was on June 12th.  If I don't get busy, the book this year is going to be very, very, thin.

My newest direction is to keep it simple.  (At least keep the front of the piece simple.)

I've done draped pieces in bronze and copper, but not in silver.  So I finally did one in silver ....... and I like it.  I kept it for myself and have been wearing it a lot.

The Front

The Back (haven't worn this side out.  I like the other side too much.)

I have another simple piece that isn't finished yet as I have to figure out how I want to hang it.
So..... I may be posting a few grandchildren posts mixed in with the metal clay posts.  

Need to thicken that book somehow!


Thursday, June 12, 2014

Oooooh,,,,, Rings!

Anyone who knows me, knows I just  love, love, love making and wearing rings.  (I've posted many times about my love of rings.)

I don't make rings in my size as I want to keep them all.  But, it doesn't work to make rings unless it's a commission because they are never the right size.  Oh well.

Anyway, I've had this book Contemporary Metal Clay Rings by Hattie Sanderson for awhile.  I think I pre-ordered it even.  (Oh, the allure of rings.)  Hattie is well known for her ring making skills and of course a book by her is a must have.  So I did.


The book is filled with wonderful eye candy along with great photos of the processes of making a ring. Every step is clearly shown through pictures.  There is general information on ring making and working with metal clay as well as specific projects.

I have to admit, I haven't actually used the book much except for inspiration.  But after pulling it out and looking at it again I'm getting in the mood to try some of the rings styles that I haven't done.  (I'm finally out of my funk and this is a good way to get the creative juices moving again.)

Check out this link to see a short video about this book.  Contemporary Metal Clay Rings

The back of the book has a gallery of rings by many well known metal clay artists.  Many of them I've met at conferences either as a fellow student or as the teacher of my class.  (That makes it extra special knowing these people..... and inspiring.)

And of course, after I try some new ring styles I'll be sure to share on my blog.  (Along with a new direction in style that I've started to work on.)

Check the book out and let me know what you think.  I'm sure you are going to like it.

Wednesday, June 11, 2014

Art Inside Studio Tour

This weekend is a busy one in Oil City.  Lots to do and see and it's all free!

Indie Fest starts on Friday with a variety of bands.  Locations will be all over the place.  Some will be in establishments and some will be set up on the street, along with some other outdoor activities.

Grafitti Gallery has a new show opening on Friday night.  The opening runs from 5:00-7:00.  Come meet the artists and share in some good food.

Saturday and Sunday things continue with the addition of the  (first and I hope annual ) Art Inside Studio Tour.  It is a self-guided tour of 20 artist's studios.  See first hand the various artist's talents.


I'll be in my studio on Saturday only, but the tour runs on Sunday too.  If you are out and about this Saturday stop in and visit.  See what's new or if it's your first time..... Welcome!
  

Friday, May 23, 2014

A follow up.

I'm finally following up on a post I did on March 2.  Finally finished the "beer cap" piece that I posted about.  Actually it's been done for a while now, but I've been in some kind of "funk" or "artistic drought" if you want to call it that.  (Although this funk has carried over into other aspects of my life.  Can't wait until it's over.)  Sorry but I've dropped off the social map for a while too!

So, here is my latest Beer cap piece. If I do it again, I'll place a CZ at the top.  (I kept wanting to turn this one and drill a new hole.)   


I did get some good news yesterday that I am hoping sparks my mood.  I finally am going to do Franklin's Applefest this year.  I've tried other years and did not get in.  I found out that bulk mailings are sent out every year when I'm in Florida.  And since bulk mailings are not forwarded, I wasn't getting the application forms.  

This year we gave them my cousin's address.  She contacted me the day she got the form and over the phone we filled out the application.  Then I emailed pictures of some of the pieces in progress and pictures of the finished pieces.  The Chamber told us to return the forms early as it was on a first come, first serve basis.  We were the very first form returned.  (Can't get any earlier than that!)  

So now I need to get my tent out to practice setting it up and get to work on some pieces for the show.  My beer cap earrings are one of my favorites so I think I'll focus on making a bunch of those with variations.  Hopefully that will get the creative juices flowing again.  (Lord knows I need something.)

Friday, February 21, 2014

That's a First

I taught my first class today for the Fort Myers Alliance for the Arts.  Not only was it my first class for the Center but it was also the first time I had a class finish "BEFORE" the end time.  Not only did they finish before time, but they were one half hour ahead of schedule.  I have never, ever had that happen before.  (Maybe it's the sunshine.)  I don't know but it was amazing.

I hope my students went away with a sense of pride in what they've done and a feeling that they really learned something.  I also want them to have fun in the process.  This was an Intro class so they learned the basics of how to work with the clay.

So, here is some eye candy from my students.  Unfortunately not all my pictures turned out so everyone is not represented.  (I'm sorry.)


Margie and Kelly Nasuta hard at work.


Stacey Brown wearing her creation.  A pendant with bail and CZ.


Husband and wife team, Nancy and Mac Gadway
Mac made the piece above and Nancy made the pieces below.


Margie Nasuta's pendant and earrings.  The earrings are an easy way to use up left over clay.


Donna Posteraro is from my home state of PA.  The class is a Christmas gift from her son.  And she thought she wasn't artistic at all.  I beg to differ.

Unfortunately I have no pictures of the pieces by Darlene Brindell, Annemarie Blue and Kelly Nasuta. But believe me they had nice work.  My photography skills are just less than exemplary.

Another fun day.  Lots of good people and as I said before..... a first!   I just can't get over it.  I'm still dazed.  (I was able to meet my husband and friends at Bubba's for dinner because the class finished early.)

Sunday, December 1, 2013

Tis the Season

Well it Tis the Season to be busy...... and busy it is.

Last week I held my annual Open House which despite the weather was nicely attended and my sales outdid last year.  The past five years they have been steadily growing.  I tried to compare my first two years but did some different kind of book keeping then so I wasn't able to separate those sales from my other sales.

This weekend I took part in the SugarCreek Craft Show which has been going on for thirty years.  This was my first year to take part in it.  My tables were positioned right next to Linda Lineman from Lineman's Porcelain paintings.   Linda is another one of the artists in the National Transit Building (in fact she was the very first artist to have a studio.)  Now we have twenty three artists in the building.  So we would sit and chat during the down times and watch each others tables during potty breaks.  (At my age those are pretty frequent....  just sayin!)

My dear cousin, Debi Plyler came out to help too.  She helps me out when I can't be in my studio on Second Saturdays and with an assortment of other tasks.  We started setting up at seven AM and anyone who knows me, knows I am not a morning person.  (It was a long day yesterday.)  Today was a little easier as the doors didn't open until noon.  Debi had one of her migraine headaches and is such a trooper that she toughed it out today until the end.   (She's also a good sales woman; which I am not.)


Here's "Vanna" herself.


The venue is not really suited to my kind of jewelry (and prices) but who knows what may come of it.  It gets my name out there, it's a cheap form of advertising and hey....... we were right by the kitchen.  Yesterday I had a wonderful chicken salad croissant and today vegetable soup.  They had a nice selection of food to choose from.

Sales weren't the greatest but enough to pay the rent for January.  Besides I met lots of nice people, both customers and fellow vendors.  I'm going to do it again next year and who knows, maybe some people will be looking for me.


Sunday, November 17, 2013

Facing an Old Fear

Back when dinosaurs roamed I took a fabrication class with fine silver during my freshman year of college.  I loved it.  I tried it all.  We learned how to work with a jeweler's saw to cut out a shape and learned how to cut out an interior piece.  I actually took a piece of granite, used the wet saw to cut out a slab and shaped it into a cab on the grinder, then polished it.  After that I made a back piece, attached the cab to the back with a bezel and incorporated it into a body ornament.  (No need to go into all this, I think I've done that before.)

The point is, I did some major soldering back then and thought nothing of it.  Those days we used silver sheet solder and cut tiny pieces to be used between two shapes.  I do remember that solder will not fill in gaps, therefore the two pieces need to have a good connection.  What I can't remember is how does one know when the solder has melted and flowed when you can't see it.

Luckily for me, I use paste solder and only on places where I can see it flow, like earring backs and now jump rings.  The solder comes in a tube and has "flux" already in it.  Flux is what makes the solder flow.  When we soldered in class, we had to brush on the flux before placing the tiny piece of solder.  The paste solder is applied with a "pick", which is a pointed tool.


Up until today, I had only soldered earring backs (a piece of cake.)  Today I soldered jump rings closed.  (Also, a piece of cake.)  I have avoided doing it for so long out of fear I guess.  So, I went to YouTube and found a demonstration.  Geez...... how easy!

A lot of fancy tools are not needed; just a fire brick set on a cookie sheet, the solder and a torch.  (I used my kitchen torch.)  A very tiny bit of solder is needed for the seam of the jump ring.  Apply heat to the jump ring for just a few seconds until it turns red and you see the solder flow.  Then quench in a glass of water.  It's that easy.


Afterwards, the piece will need to be set in some kind of pickling solution to remove the fire scale.  But, that doesn't take much.  I finished off four delicate chains today with soldered jump rings. They are all ready now for the clasp and a focal point.

Originally, I was doing this so I could solder a cross that a friend commissioned.  I usually use "Snapeeze" jump rings in all my pieces as I really, really trust them to hold.  But the chain in this piece was so delicate that I couldn't get the 4mm Snapeeze through the link.  (Although, later on I was able to get it on the ends.)  In the end, I didn't solder this piece at all.


Soldering can be daunting at times.  But for what I do it is not.  Time to quit putting things off out of fear.  


Friday, October 18, 2013

"Makin" It

As was mentioned in my post about the "Screw" Necklace, I used an extruder to make the sides of the necklace.

An extruder is a tool (mine was made for polymer clay) that pushes out a line of clay in a variety of shapes.  I haven't used mine that much and sometimes I wonder why.  It is such a handy little tool.


This is a Makin Extruder, which can be bought in any craft store.  It comes with a large variety of (for lack of a better word) templates.  These templates are placed in one end, the clay goes in the other end and then the handle is turned..... pushing the clay out through the template.  This creates a line of clay in the shape of the hole in the center of the template.  The templates come in a variety of shapes, triangles, squares, rectangles and circles to name a few.  


For the "Screw" pendant I used the square template for the outside edges.  I needed something to create the well that would hold the resin.  Since the size of the square extrusion was rather large, I cut it into fourths after extruding it.  The inside divisions were rolled by hand using a flat sheet of Plexiglas to make them more even.  

Another great feature of the extruder is it's ability to make hollow pieces.  (It did take me quite a little while to figure out how to use it.   Unfortunately it's been quite awhile ago, so I'm sure it will take me that long again.)  These templates push out something equivalent to a piece of "macaroni."  (Tried covering a piece of spiral macaroni once with metal clay paste........ it didn't work.)  


This piece took me a long time to make as I wasn't sure how I wanted to finish it.  I made the focal piece in a class and obviously my idea changed along the way.  I didn't finish it the way I thought I would.  (Hence the extra two holes at the top.)   


Tuesday, October 8, 2013

Heads or Tails?

I just finished two commissions back to back and they both were very challenging.  The first was to incorporate a "screw" into the piece and I wrote about it two posts ago.  

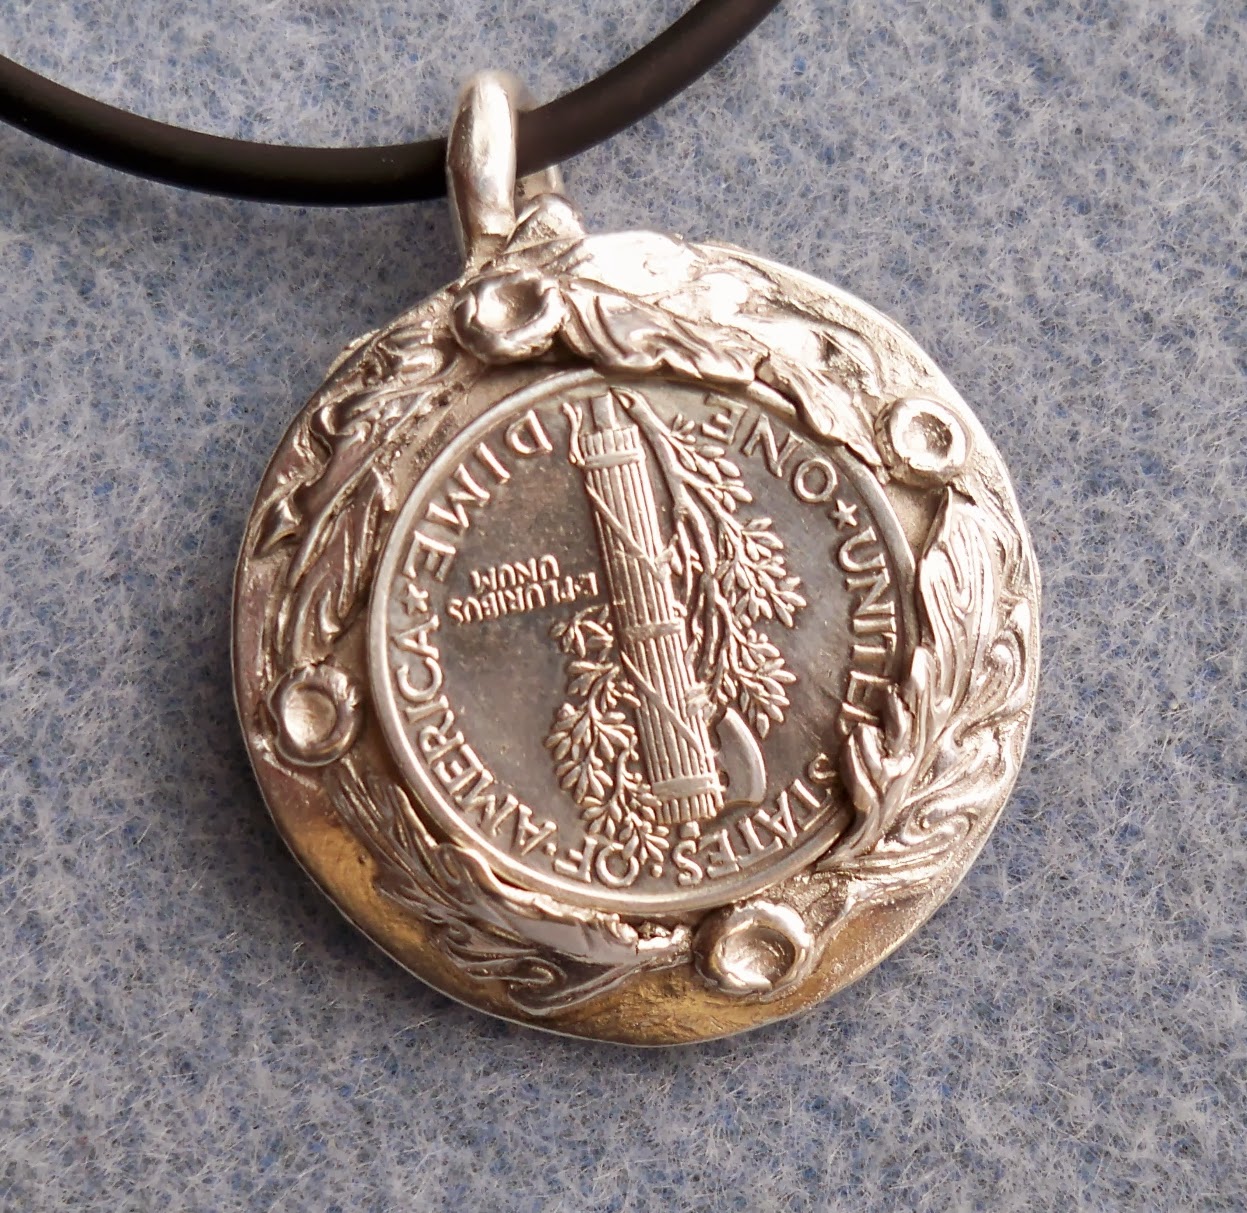
The second commission was to incorporate a 1943 dime into a necklace.  I guess I have to say the screw was more challenging to design and execute.  But, even though the idea for the dime came to me much easier, it too was a challenge to execute.  

Once again I didn't charge the customer for "all the time" I spent on the piece.  I was doing something I hadn't done before so I chalked it up to a learning experience.  

This time my personal challenge was to create "tabs" to hold the dime in place.  The tabs needed to be small enough so they didn't cover the dime too much.  They also needed to be made so the dime could be removed in the future if need be.  Since I'd never made tabs before, I wasn't sure how thick the clay should be and how high to make the pieces that would fold over the dime.  I also wanted them to basically be "invisible" by blending into the design itself.  

Another consideration was once again the shrinkage factor of the clay.  I needed to cut out a hole that would shrink just the right size to allow the dime to be inserted in the fired piece.  Once again the computer was my friend as I enlarged a scan of the dime to 118%.  I made a mold of the dime and used it to make a "stand in" so the tabs wouldn't shrink any smaller than I needed them to be.  

The leaves were each cut individually and pasted on one by one.  Talk about tedious.  I didn't put as many leaves on the back as those were to act as my tabs.

My next step was one of the most crucial in the making of this piece.  I HELD MY BREATH AND PRAYED IT WOULD ALL TURN OUT!  How's that for precise planning?

My method of madness worked and everything fit.  Since the silver is at it's most pliable fresh out of the kiln, I added the dime and started the process of bending the tips of the leaves over the dime. It was going well until one of the tips broke off.  Luckily (I live dangerously) there was enough other areas to hold the dime tightly in it's place.  There is no movement what so ever.