Showing posts with label jewelry. Show all posts

Friday, February 21, 2014

That's a First

I taught my first class today for the Fort Myers Alliance for the Arts.  Not only was it my first class for the Center but it was also the first time I had a class finish "BEFORE" the end time.  Not only did they finish before time, but they were one half hour ahead of schedule.  I have never, ever had that happen before.  (Maybe it's the sunshine.)  I don't know but it was amazing.

I hope my students went away with a sense of pride in what they've done and a feeling that they really learned something.  I also want them to have fun in the process.  This was an Intro class so they learned the basics of how to work with the clay.

So, here is some eye candy from my students.  Unfortunately not all my pictures turned out so everyone is not represented.  (I'm sorry.)


Margie and Kelly Nasuta hard at work.


Stacey Brown wearing her creation.  A pendant with bail and CZ.


Husband and wife team, Nancy and Mac Gadway
Mac made the piece above and Nancy made the pieces below.


Margie Nasuta's pendant and earrings.  The earrings are an easy way to use up left over clay.


Donna Posteraro is from my home state of PA.  The class is a Christmas gift from her son.  And she thought she wasn't artistic at all.  I beg to differ.

Unfortunately I have no pictures of the pieces by Darlene Brindell, Annemarie Blue and Kelly Nasuta. But believe me they had nice work.  My photography skills are just less than exemplary.

Another fun day.  Lots of good people and as I said before..... a first!   I just can't get over it.  I'm still dazed.  (I was able to meet my husband and friends at Bubba's for dinner because the class finished early.)

Monday, November 23, 2009

Big Frog in a little pond


As usual I just start playing with the metal clay and see what comes. Well, it isn't as easy as it would seem. Often, it takes more time than is necessary and there are times when it appears that nothing is going to work. (Although I only have one piece in my scrap jar that I gave up on.)

Big Frog in a Little Pond is one of those pieces. It started out as a circular disk for a demonstration on rolling, texturing and cutting out the clay. Now I don't even remember what my original intent was. The piece sat on my work table for weeks while I waited to hear what it wanted to be. There was a frog that was fired also sitting nearby and I decided to use it with the piece. Originally the frog was going to sit on the rippled water surrounded by a variety of leaves. But, the piece was too small and needed to be enlarged, so another textured piece was made to put on the back to enlarge it. Since this reminded me of water, I used the texture with the Koi fish on the back. (So I guess it could be said that this was also a big fish in a little pond.)

The leaf punches that I had just looked too plain so I used a leaf mold that I got from one of my Tennessee friends. It worked great but was rather large and hung over the edge. So again the design took another direction as I designed a bail on the back to mimic the overhang.

The next step was to move the pendant up a notch by making the clasp, rather than using a ready-made one. The clasp is simple, just a toggle and bar done in the same Koi texture.

The turquoise beads add an earthy feel and the crystals represent water. (For some reason I've been on a water kick lately. Maybe I can sound very artistic and say it's part of my water series.)

Sunday, November 22, 2009

Finally!!!


No, I don't have my computer back. But, I 'm on my daughter's computer and I know how to download (upload?) pictures to it.

So.... here's a couple of pictures.

The first picture is of the copper (sort of) fiasco. It wasn't a total loss as the underlying copper was fine. But what a mess the rest turned out to be.

The other picture is an example of a piece I made as a demo during a water etching class. I'm very pleased with the final design of the whole piece. But, that wasn't always the case.

During the Arrowmont earring extravaganza, Linda Kline showed us a technique that included a tab designed right into the piece. The piece was fired flat (like the by-pass ring) and the tab was bent into a round bail after firing. I didn't get a chance to try it, but my friend Nancy (who was sitting right next to me all three days) did. She made a water etched pendant and was nervous about bending it; but it worked slicker than you know what. It turned out beautifully.

So, I never did a test piece (that would have been too logical) before my class. Instead we dove right in (thank goodness I only had one student), made our pieces with the tabs and fired them.
Then came time to bend them. (You know where this is going. Do you see a bail on my piece?)
Yes, they snapped off. Both of our pieces broke.

My student drilled a hole in her piece and hung it with a jump ring. I pasted the broken bail onto the back and re-fired it. For months it laid around my studio, while I tried to decide what else I wanted to do with it. I was listening, but it wasn't talking. Finally, one of the other jewelers in the Transit building, said she liked it just the way it was. So I took another long look at it. Looked in my basket of beads and this is what I came up with. I do really like it now. It has a South Western look.

Another unfinished piece done. Finally!

Sunday, September 20, 2009

Coconuts... the difference between age and youth


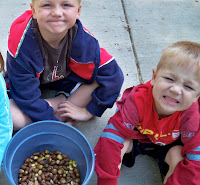
This blog is not about coconuts..... it's about acorns. (My four year old grandson calls them coconuts.)

The grandsons stayed overnight yesterday. This morning they wanted me to come to the playground and see their stash of acorns under the play set. They were so excited about those acorns. They wanted to collect more, so I gave them a bucket and tried to talk them into cleaning off my deck. There are thousands of acorns on the back deck. (Actually, hundreds of thousands of them.!) The little girl up the street got into the excitement of it all and the three of them were out back squealing with delight at every acorn they found. (I was wondering what the neighbors were thinking.) The porch acorns didn't excite them enough though (darn!) So, they went in search of acorns in their natural state...... under the tree.

To me the acorns are nothing more than a big mess that has to be swept off the deck. I can hear them bouncing, banging and pinging as they hit my deck, table and chairs. When we are trying to sleep, it sounds like WW II out there. That big oak tree by the deck literally throws them. (The little neighbor girl started to throw them back.) We take our life in our hands when we venture onto the deck. Haven't been hit by one yet, but I don't imagine it would feel very good. There is nothing to get excited about when it comes to acorns.

I remember when acorns did excite me. One of my first pieces of jewelry when I was a kid was a bracelet I made by stringing acorns and pearls. I used a long needle and threaded a string through the acorn like it was a bead, alternating it with pearls. (Don't know how I did that. Don't think I would have the strength now to push it through an acorn.) I would wear that bracelet for a long time until it fell apart. I loved that bracelet. Sometimes I think I should make silver acorns and make that bracelet again with the pearls. Not sure though that the contrast of brown and white, raw nature and shiny pearly nature could be captured in silver.
I'll have to give that one some thought.


The grandsons wanted to know if they could go around the neighborhood. The three of them wanted to try to sell their precious acorns. Maybe I'm a millionaire and don't know it!

Friday, April 10, 2009

Finally!


  Well, I finally made something!  Since I got home from Florida, I haven't really accomplished a lot as far as metal clay goes.  Today, I finally feel like I'm back in the groove of heading to the studio and getting some work done.  

   Two weeks ago, I taught a class in making metal clay cones and toggles.  The next day we learned how to weave a kumihimo bracelet and added our cones and toggles to the bracelet.  (What I learned from teaching that class will be the subject of another post, later.)   I made a couple extra cones that day and used the longer set to make a pair of earrings.  

   The cones were made over the "Kreative Kone making kit" or over cake decorating tips.  The cake decorating tips are not aluminum so they are okay to use.  This particular set of cones was made using the kit.  Then I used the cake decorating tip to make holding the cone easier to sand and decorate.  They were decorated first with paper clay and then syringe clay which I sanded down to give a flat surface.  Adding a liver of sulfur patina really added the needed touch.

   It feels good to finally get a piece made.  It's been two months.  Hope this puts me on a roll.


Saturday, March 7, 2009

Who knew?

   Who knew there was so much to the flex-shaft.  I just started perusing (like that big word?) my new book - "Making the most of your Flex-shaft" by Karen Christians.  

   I've owned a couple of handheld rotary tools over the years that came with all sorts of bits, wheels and mandrels; none of which I knew how to use.  So, they got limited use and weren't very effective (since I didn't know what I was doing!)  

  As I've said in my very first post, I'm not a jeweler.  I'm a metal clay artist who makes jewelry.  I had one jewelry class in college, many moons ago which was all fabrication.  So, I am learning as I go (and there is sooooo much to learn.)  Right now my focus is on the flex-shaft tool (and making metal clay toggles.)

   Anyway, the gist of this post is a book review.  I haven't read it all yet, but I can see that my new flex-shaft book will be an invaluable resource that I will be referring to often.  (Because like most directions that come with tools.... they don't tell you squat!) 

   The book covers every little detail you might want to know from the invention of the flex shaft to maintaining it.  There are chapters on choosing the right motor, the proper hand piece, the proper bur or bit and mandrel.  Then she covers abrasives, grinding wheels, buffs, etc.  There are attachments available to extend the capabilities of the tool and a chapter that goes beyond the basics.  And, finally in the back are resources for jewelers.

  As I've looked through this book, I've had some Aha! moments.  Now I know what that little drum shape was for or that stack of what looked like gritty toothless saws and the pointy screw mandrel.  All those years wasted, while I was waiting for such a book full of information.  I sure could have used the knowledge I've gained from this book when I was teaching.  I would let my students use the rotary tools when we were doing sculptures, but we weren't getting the most out of it.  At least I was aware of the safety issues.  That came from my college sculpture teacher scaring the crap out of us when it came to power equipment and I thank him for that.  (He cut his hand in half using the table saw!)

  Point in case.  This is a must book to have if you have a flex-shaft.  


Sunday, February 15, 2009

Snapeeze

     There have been discussions on my forums in the past about jump rings.  Via Murano makes a sterling silver jump ring called the "Snapeeze".  It comes in a 6 mm size and an 8 mm size.  It is called "Snapeeze" because it makes a snapping sound when you wiggle it back and forth which means that it is closed.  These jump rings are pretty expensive, which is what precipitated the discussion.  All jump rings will click when wiggled back and forth, which signifies that they are closed.  And most of them are much, much cheaper than the "Snapeeze".  Now it depends on what the jump ring is being used for as to whether I use the "Snapeeze" or not.  At first I used them for everything, but in these economic times I have cut back.  I do use them for something heavy and definitely for bracelets.  All the charms on my educational bracelet are attached with the "Snapeeze" jump rings and I have not lost any of them.  In fact, I've had to take a few off  and could not find the seam; that's how well they close up.  

    Sorry I haven't written anything lately, but I've been on vacation in Sunny (and warm Florida).  It sure beats the cold in Pa.    I'll try to write more now.  

   But, if you want a good sturdy jump ring, go to www.viamurano.com.  I 

Sunday, December 28, 2008

Swing locket


    I recently got a commission to make a locket for Christmas.  Never having made a locket before I started looking around for some "how to's".    Tim McCreight's book "PMC  Technic" was recommended to me because Celie Fago has a chapter in it on making PMC hinges.  Making a hinge looks pretty involved and since I didn't have the time for such dedicated learning I kept on looking.  

  In Celie's chapter on making hinges, she showed a picture of a swing locket, which looked intriguing to me.  But, she didn't talk about how she made it.  So, I went on the hunt again.  This time I found directions for her swing locket on the Art Jewelry Magazine's website, purchased them and downloaded (or is it uploaded) them to my computer.  Again, this particular style of locket didn't seem to fit the client that I was making the locket for so I started looking again.

  The third find was almost a charm.  I don't remember exactly how I found it, but there was another metal clay locket in a Vintage Bead magazine.  So, I sent for that one too.  (By now I've got major time and money invested in my searching.)  Took about a week for the magazine to come, but the article appeared to be exactly what I was looking for.  Next I had to order some fine silver keys to imbed into the clay to create the hinge.  (While I was at it, I ordered fine silver tubing, just in case.)  That took a few more days, but once they arrived I set to work.  As I worked on the locket,  questions started popping up about the directions.  The directions were feasible, but sometimes I felt they were not practical or very clear.   

  Finally, I put all that aside and started to work on my own.  As usual, when doing a commission, I made more than one locket.  (Actually three in all.... the other two are not totally finished and may now take a different direction.)   The finished locket is simple and traditional in  design.   (I felt the client wasn't into the arty look.)  The finished locket has a front and a back but can be worn either way.  There is room for a photo on the inside of the back piece.  It turned out to be a swing locket after all.  The biggest challenge for me with this particular design was to have some kind of  "lock" to keep it from swinging apart without warning.  What I did was hang a drop from the bottom with a jump ring and notched out the front (circled in red) so the jump ring can protrude through the front piece and hold it in place.  

  The client wanted some earrings too.  They were made by sandwiching the fine silver key between two discs.  

  All in all I was pleased with the way it turned out.  As usual, the pictures do not do them justice.    The locket and earrings were to be picked up in a few minutes (that is another whole story) , so I just clicked a couple of pictures as they laid on the studio table.  

  Maybe some day I'll get a commission that will be a breeze to make.  (Right .... as if that will ever happen.  I always make more work for myself.)


Friday, December 12, 2008

Charm swaps


      The Art Jewelry magazine's website was my first foray into an online forum.  I was looking for other people who did metal clay and that seemed a logical place to start.  They had a section for metal clay enthusiasts, both experienced and beginners.  It was through this forum that I tried out my first charm swap.   

    Lucky for me, I'm an eternal optimist or I never would have gotten into another charm swap after the first one.

   The year before, the charm swap had lots of participants.  Last year there were only seven of us and only two of us made our charms and mailed them to the girl who was coordinating every thing.  We waited...... and waited........ and waited.  Our charms never came.  I tried contacting the girl.  But she never answered.  The other girl who sent charms did get an answer and a promise to send her charms back before Christmas (2007).  But, she never did.   

   I just chalked it up to a lesson learned, until I went to the PMC conference in Indiana last July.  Lo and behold, there was the girl who had my charms.  My friends thought I should confront her.  But I remember her picture on the forum showed her in red boxing gloves and she sure looked like she could clean my clock.  So, I opted to wait until after the conference and try emailing her again.  This time I tried to use a little strong arm persuasion in my email.  Didn't work.  I never heard back from her.  

   Again, I chalked it up to a lesson learned.  Today I got an email from the other girl involved.  She decided to give it another try and did get a reply.  She is supposed to get her charms back before Christmas.   And she offered to give the girl my mailing address too.  I also emailed her again.  So.... maybe, just maybe I will finally get my charms back.  We'll see.  

    I've been in two other charm swaps since and have been very satisfied.  I exchanged charms with my friends from my certification class.  At the conference I exchanged about twenty five charms with people from all over the world.   I put them all on a lovely charm bracelet, which gives me a warm and fuzzy feeling when I wear it.  (Which isn't as often as I would like.   Everyone expects me to be wearing jewelry I've made myself.)
  

Wednesday, December 10, 2008

How hard can it be?


  Now one would think that making a piece a second time would be easier, right?  I have not always found that to be the case.  The latest case in question is a spiral pair of earrings that have a swarovski crystal butterfly dangling off the bottom.  They were tricky the first time.   I had planned to wrap  thin strips of clay around two straws, slide them off the straw, drill holes in both ends and that was all it would take.  I figured I could just turn one spiral upside down to mirror the other one.  Wrong!  I found out that each straw has to be wrapped in a different direction from the beginning.  (Got some extra pieces out of this project which are still waiting to be used in something...... that is if I can remember where I put them.)   Then came the drilling.  Let's just say the earrings are shorter than I planned.

   Anyway they managed to get finished.   I have an order to make another pair.  This time I know to wrap them in opposite directions.  For some reason, all but one of the earrings split when I went to drill them (and remember they each have two holes.)  I was very, very careful (after the last time) and couldn't believe it when they split.  I think it must have something to do with the slight curve at the ends.  I ended up making three pairs of varying lengths and thicknesses.  Figured I'd better make a few more while I was on a roll.    They're out of the kiln now, in one piece and ready to be turned into earrings.  

  It was a successful day at the studio, but not an easy one.  

   My next project is to find a whole box of shiny metal clay pieces that I've somehow misplaced.  (I hate it when I do that.)  I'd better find it as there is a piece in there that I need to enamel before Christmas.  Is it St. Christopher we pray to for lost things?

Monday, November 17, 2008

Open House


Here's some photos of my Open House.   I dragged almost everything out of my studio and tried to set up an inviting display.  The rings gave me a problem as I wanted to hide the ugly tags.  I set them on snowflakes and hid the tags underneath the snow flake.  It worked for a while, but as you can see it didn't last long.  I won't be going to this extent the next two events.  I'll set up displays but not as elaborate.  

Tuesday, November 11, 2008

Yahoo!!

  Yahoo, my business plan is finally done.  (And two days before it's due!)  I made a business plan the last two years but they were only a couple of sentences long.  I didn't really know what a business plan looked like but now I do and it is thirteen pages long!!!!  It is a little scary, especially trying to project sales and cash flow for the next year.  If only real life worked the same as it does on paper.  I guess that is why we put it on paper so we can work on making it come true.   Anyway it is done and all that is left now is to make my elevator speech on Thursday night, turn in the business plan and graduate.  (Graduation gives me a years free membership in the local Chamber of Commerce and you can bet your boots I'm going to take advantage of that.) 

  One of our assignments was to interview our competition and I want to mention the gracious ladies who gave freely of their information to help me out.  You might want to check them out.  There is some nice work out there.

   Mary Boden who lives right here in the Franklin area has been doing polymer clay jewelry, printmaking and silver jewelry for years.  Her website is www.woodthrushstudio.com

   From Warren, Pa is Adrienne Grafton.  She originally was from Franklin also.  Her silver smithing studio is just down the hallway from my studio.  Her website is www.adriennemgrafton.com

   Melissa Muir is from Akron, Ohio and does traditional silver smithing.  I became aware of her work from one of the forums I belong to and I bought one of her necklaces for my daughter.  Her website is www.melissamuir.com

   And, from the other side of the state of Pennsylvania is Holly Gage.  Holly is the only metal clay artist that I contacted.  She makes her living from making jewelry and is very involved and well known in the metal clay community.  Her work is gorgeous and can be seen at www.hollygage.com

Sunday, November 9, 2008

Visitors and Guilds


        My studio is fun to work in but it is more fun when there are people to work with and I've had lots of visitors the past few weeks.  

     Besides the Designing Women from Tennessee,  Dorothy Psuty from Titusville, Pa. treated her daughter Ingrid to a mini-introduction to PMC class.   Check out Ingrid's website at www.ingridpsuty.com to see some of her fabulous pieces.  Her jewelry pieces based on the work of famous artists are my favorites.  (Must be influenced by all those years of teaching art history.)

   Yesterday, the Western Pennsylvania Metal Clay Guild held their November meeting at my studio.   Four members from Pittsburgh made the two hour trip up to Oil City (which I really appreciate).  There were six members in attendance and two guests.  We started out with show and tell, then eagerly heard about Jan Durkin's experience in her certification class with Celie Fago.  From then on we just played and had a great time!  The longer meeting gave us plenty of time to complete a project from start to finish.  Everyone brought such a variety of snacks that we didn't have to stop for lunch.  We did make a short trip to the gallery downstairs though but then it was back to work (I mean play.....  when work is fun it is called playing.)    A benefit of a longer meeting is that the extra time gave us more of a chance to get to know our guild members better.  

   For anyone doing metal clay, joining a guild is a great way to share experience, knowledge, tools and fun with other people who do what you do.  I recommend seeking out a guild in your area.  You won't regret it. 


Friday, November 7, 2008

Part time business- Full time job

   Well, I only have one more week to go until I graduate from my business class.  The class was three hours long for nine weeks and was well worth taking it.  But I am finding out that starting and maintaining a business is full time work.  (Darn, I'm retired and I only wanted part time work... but that just doesn't work!!!)   We covered a lot of information and my head is somewhat spinning.  Our business plan is due next week and I hope to work on it tonight and get it finished.  I made a business plan last year when I started making jewelry, but nothing like this.   A business plan is a pretty detailed thing.  This class has spilled over into my personal life too as I am budgeting my personal money better.  (The hubby isn't happy with that one as he has to watch his spending too.)  But, that is a good thing!  (Did I just sound like Martha Stewart?)

Tuesday, November 4, 2008

Not bronzed yet!

       I have been reading a lot of posts on the metal clay forum about the new bronze clay.  I've got a sample pack and a 200 gram pack but haven't even opened them.  For some reason, the bronze clay doesn't excite me like it does everyone else.  In my opinion, it was brought out too early and all the kinks aren't worked out yet.  A friend and I are waiting until everyone else figures it out before we try it.  

      And, I guess that I haven't been doing metal clay long enough to feel that I know all there is to know about the silver.  I'm still exploring that.  But with that said, I have seen some very nice work done with the bronze clay.  The only bronzing I'll be doing is my legs with the Jergen's cream.  (I hate white pasty legs!) 

Friday, October 17, 2008

Bead and Gem Show

   Today I went to my first ever Bead and Gem show.  It was okay, but not what I expected.  I  guess I expected great bargains and wholesale prices, but there were few of those.  There really weren't as many vendors as I expected either.  The very first thing I picked up was a $295 string of beads.   Gulp..... not in my price range.  There were also lots of finished jewelry pieces, but none that I considered anything different than the usual.  I browsed around for about and hour and a half and did manage to find some things; even though I couldn't find anything that I was looking for.  I spent $52  and got a variety of beads.  For some reason today I was in the mood for multi-colored strands of the small variety.  There were some "huge" beads, but that's not me.  I'm not usually a Swarovski crystal kind of gal either, but those were pretty impressive.  There was a whole wall of Swarovskis and they almost blinded me.  I never knew they sparkled like that.   But I guess when you hang hundreds of thousands of them together, that's how they look.  I did buy a 24" strand of multi-colored Swarovskis and my daughter and daughter in law will like these, some little butterfly Swarovskis.  Those were pretty decently priced.  

    Even though I probably won't go to another one, I did enjoy myself.  I rode to the show with a fellow artist from the Transit Gallery.  Gave us a chance to get to know each other better.  Now though, I've got to get busy, make more metal clay and use my new beads.  That shouldn't be too hard.

Sunday, October 12, 2008

Being a critic

Every Friday is critique day on my metal clay forum.  Usually, one or two members step up and share a work with the rest of the forum for an old fashioned critique.  These critiques are really valid as the members who participate really lay it out there.   Even those who have written books or articles and are well respected in the field have taken a turn and opened themselves up.

It has been years (and I mean YEARS) since I sat in on a critique.  I was always nervous about them.  Some went well and some, not so well.  I was never very verbal at these critiques and sort of laid low; never asking for comments (which I now regret.)   Constructive criticism offers us other viewpoints about our work and helps us grow as artists.   

As an art educator, I had to evaluate the work of students.  I usually set the criteria for the assignment, which made it a little easier.    If it was independent work, I had the students write about what they were trying to accomplish with that particular piece.  This would help me to make a judgment about the work.  Evaluating the work was the one thing I did not like about teaching, but we had to give some sort of grade to satisfy the higher ups.   One of the main things I looked for was originality and going beyond the basics of the assignment.  Many of the students thought their work was original, but after thirty five years of teaching I saw lots of repeats.  I gave very few 100%.  I told them they needed to knock my socks off for a 100%.  (Actually I don't wear socks so that was hard to do!)  But there were some and I still remember them to this day.

Now I need to start putting myself out there for criticism.  One of these days I will get brave enough to do that on critique Friday.  Jewelry making is fairly new to me and I need to look at as much jewelry as I can and learn as much as I can through trial and error.   I need to grow and develop and knock somebody's socks off.  Critiques can help with that.  

This whole post came about because a friend of mine in Florida, asked for a critique of a website she is working on.  I applaud her for getting a website started, and I applaud her for asking other people's opinions.  I need to do the same.  

Thursday, October 2, 2008

Finished rings

Here are some pictures of a few by-pass rings I've made lately.  As I said in an earlier post they are  easy to make but more challenging to design.  I've also discovered that it is not a good idea to have the design protrude much beyond the ring band, as it is likely to catch and can distort the ring.  That wouldn't happen with a traditional ring that has a closed band.  I'm embarrassed to say that I caught mine on the toilet seat the other day and pulled it a little.  (I'm not going into detail, thank you!)  It wasn't much, and it easily pushed back into shape with my fingers. But I can see how it could be a problem.  Most of my designs for this ring from now on will be 
closer to the band.


Wednesday, September 24, 2008

By-Pass Ring

       I taught a class yesterday on making by-pass rings.  You know, the kind that wraps around your finger and the ends by-pass each other.  The ring was designed by Jeanette Landenwitch and she gave me permission to teach it.  The directions were simple; roll out the clay, cut a strip, decorate it and fire it.  Once it is fired, the strip is bent around a metal ring mandrel with the fingers.

    Sounds easy enough and it is.  The hard part is designing the ring.  Unlike making a regular ring you don't know exactly what it will look like until it is done.  So, I had to try to adjust the lesson to make the outcome a little more predictable.  At least as predictable as is possible.  We'll find out tomorrow how our designs worked out.  I fired them today for maximum strength.  My student, Carol, came up with a good idea.  She made the band and decorated only one end.  After she wraps the ring, she is going to finish the other end so they line up and refire it for a shorter time period.  

I love teaching; you learn something new every day.  

Monday, September 15, 2008

A purist at heart


There were several products at the metal clay conference (besides the bronze clay) that created quite a stir.  Both, were ring making products.  

One is marketed by www.metalclayfindings.com and is a ready made silver band just waiting to be decorated with your own metal clay designs.  This method eliminates the need to make the ring bigger to allow for shrinkage.  

The other product is the Japanese ringmakers.  These allow you to make your own ring bands in a pre-made mold.  The molds come in varying widths and styles; again allowing you to add your own metal clay designs.  Some of the rings made from this method were on display and were simply beautiful.  The Japanese ringmakers do not allow for shrinkage, so it is necessary to buy a mold bigger than what you need.  It is also confusing to try to figure out what size is needed as the sizes are not compatible with American ring sizing.  www.pmcconnection.com is the carrier for the Japanese ringmakers, although I hear they are not listed on the site. 

 But for me, I guess I'm a purist. I love making rings and I love making them on my own from scratch.   (Not to mention the extra added cost of such gadgets.)  The closest I get to using an aid is a ring pellet that fits inside the ring when fired, to keep it from shrinking more than is wanted.   Sometimes it is frustrating for sure, but somehow it seems like cheating to use those readymades.